If you don't want to run to the kitchen to start making irresistible desserts, you should stop reading. Honestly, I consider that I've given you fair warning, and if you make these cookies and complain about how wonderful they are and how your defenses are immune to their pull, please don't say that I didn't warn you.

There are few cookies that rise to the level of the classic chocolate chip in my esteem. These do. Sometimes, they are even better. I guess it's not shocking, the combination of peanut butter and milk chocolate has always been a favorite. These will satisfy on many different levels- salty and sweet, ooey-gooey and crispy, sandy crust, melty chocolate. Yea, they are beyond a triple threat. Obviously you're feeling pretty confident about yourself if you haven't clicked away at this point, so we might as well dive in. I am going to do this a little differently just to see how it feels, I'm going to list the recipe first, then go through my steps. If you've been playing along, you know that I bought the Baked cookbook in a moment of weakness after buying two other cookbooks that month. Of those three, it's the best. It might be the best baking cookbook that I own. Wow. Yea, I said it.
Peanut Butter Cookies with Milk Chocolate Chunks
From Baked by Matt Lewis and Renato Poliafito
1 cup butter, softened
1 cup light brown sugar, packed
1 cup sugar
1 cup creamy peanut butter (I used Costco's organic which does not have stabilizers or sugar)
2 eggs, room temperature
1 teaspoon vanilla (I use 2)
1 teaspoon salt
1 teaspoon baking soda
1 & 3/4 cups all purpose flour
8 ounces milk chocolate, broken into chunks
First things first. Butter and sugars into the mixer. Cream until light and fluffy for a few minutes. Add the eggs one at a time, beating until fully incorporated each time. Add the peanut butter and vanilla. It's considered appropriate to sift together the dry ingredients to ensure that the salt and baking soda are evenly distributed. It works best to me to add them to the wet ingredients before adding the flour. I hate dirtying another bowl if you don't have to. Proceed with either method you like.
 After incorporating the dry ingredients, stir in the chocolate. I had a bar and a half bag of chips, so I used both. Either way will be good. The authors caution not to swap semi-sweet for the milk chocolate, and they are absolutely right. It won't be the same, trust them.
 Roll into teaspoon size balls and roll in sugar. Place 2-3 inches apart on a parchment lined baking sheet.
 Bake at 360 for 10-12 minutes. Cool immediately on racks. Don't cool on the baking sheet as the chocolate might burn.
 Enjoy. Again and again.
First things first. Butter and sugars into the mixer. Cream until light and fluffy for a few minutes.
Add the eggs one at a time, beating until fully incorporated each time. Add the peanut butter and vanilla. It's considered appropriate to sift together the dry ingredients to ensure that the salt and baking soda are evenly distributed. It works best to me to add them to the wet ingredients before adding the flour. I hate dirtying another bowl if you don't have to. Proceed with either method you like.After incorporating the dry ingredients, stir in the chocolate. I had a bar and a half bag of chips, so I used both. Either way will be good. The authors caution not to swap semi-sweet for the milk chocolate, and they are absolutely right. It won't be the same, trust them.Roll into teaspoon size balls and roll in sugar. Place 2-3 inches apart on a parchment lined baking sheet.Bake at 360 for 10-12 minutes. Cool immediately on racks. Don't cool on the baking sheet as the chocolate might burn.Enjoy. Again and again.


 While that is on the stove, rinse the quinoa in a fine mesh sieve for a minute or two. Quinoa has a bitter outer coating which will dissolve once rinsed, so don't skip this step. It is fine if the quiona is a little damp when you get ready to cook it. I used about a cup and a half of quinoa, and once rinsed, spread it over the bottom of the dish which has been drizzled with a little bit of oil.
 The onions should be done at this point, so spread those over the top of the quinoa.
 After cooking covered for 30 minutes, top with cheese of your choice and bake for a remaining 15 minutes uncovered until the cheese is browned.
 I used mozzarella and Parmesan. Goat cheese, feta, or Gruyere would be good options too.
 I served the quinoa with one of my new favorite recipes found here:
 Roasted broccoli is one of my favorite preparations, and adding the shrimp couldn't be easier. This was one of those "A ha!" recipes for me. All the ingredients were in my fridge and cupboards, but I never thought to combine them in just this way. Sprinkle the broccoli with olive oil, ground cumin, coriander, salt and pepper and roast for 10 minutes. In the meantime toss raw shrimp in olive oil, lemon zest, salt and pepper and add them for the last 8-10 minutes of baking until just cooked and firm.
  Everything was fantastic, and together with the quinoa, it was a perfect healthy weekend meal.

 Add the yogurt to the bowl, and stir to combine. Freeze in your ice cream maker for 30-40 minutes or until it reaches the desired consistency. Place the finished dessert in a plastic container (just save the one that the yogurt came in) and freeze in the freezer for an hour or so before eating to firm it up.
 Scoop and enjoy. Totally addictive, yummy, and healthy. Really healthy for a dessert. ;)
  Then chop a couple peppers of your choice- I used
  Once cooked, the onions and peppers should look like this:
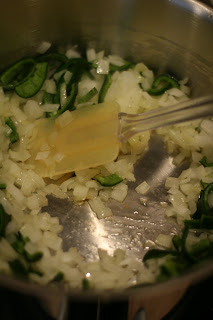 To that, add 1 pound of ground turkey or ground turkey breast. I prefer ground turkey breast, but it is sometimes hard to find. Cook, breaking up any large pieces until browned throughout.
 Now it is time to season. I used 2 tablespoons ground cumin, 1 tablespoon chili powder, 1 tablespoon ground
  Add 3 cans of rinsed beans, I used 2 cans white beans (sometimes called
  After simmering for a while (as long as you like) I thicken the chili with a little roux. Melt 4 tablespoons of butter in a small saucepan.
 Add 5 tablespoons (1/4 cup + 1 tablespoon) of flour to this once the butter has melted and cook over medium heat. Whisk to keep the mixture smooth. I love using whole wheat flour here, it adds a nice nuttiness to the chili and keeps the

 Serve with chopped tomato, avocado, plain yogurt, shredded cheese, and any other toppings that you like. The chili can simmer indefinitely on the stove covered if you aren't ready to eat it right away. You can also freeze it, just defrost in the fridge before heating. Makes about 8-10 cups of prepared chili.
 Cozy up to a warm bowl with a green salad, a
  I know, I know. You're thinking, "Wait!! It's the second of January. This is the time for New Year's Resolutions! This is the time for healthy eating! I promised to be good!" Well, don't get too worried. Yes, these are a dessert, but
  The recipe is happily basic and easy. Something you can whip up in a quick afternoon or evening. If you want to limit your
 Enjoy with a cold glass of milk- you will need it!