Showing posts with label Baking. Show all posts

Wednesday, July 9, 2008

Horse of a different color...

KAF just rocked my world. Again. Just when you think you know something, be prepared to have the rules changed. I ordered some Italian-style flour from King Arthur Flour. It's supposed to be the antihesis of American flour. With a protien content of around 8% vs. the American 12%, I expected a change. Just not this much of a change!! The flour is super soft, it feels almost like cake flour with more body. It made for a super-soft dough, and I've only gotten to the first rise stage.


I fear that I may have scared some of you off with my pizza dough recipe. I didn't mean to... I have tried so many variations, and really all of them work. So there is a lot of play in that recipe for you to try what you like. I could go on and on about things to change, but I don't want to scare you even more! Please let me know if you have any questions and I will answer then on a one-on-one basis. Also, as with anything, play with it. I can probably count on one hand the amount of times I have had to throw away the whole thing because it turned out horribly. If anything, you will probably have a lot of things turn out less than perfect, but not awful.


Back to my new pizza dough... It was truly a beauty.


At first a bit shaggy... I have never gotten this "look" with my other flour. Uh oh! I was a little nervous... After more kneading... starting to look a little bit more like normal. Still looks wet as compared to my other flour.

In the bag to rise. Cooking spray works wonders here.Wow! It rose really fast! Only about an hour later.... Look at those puffy edges. The inside was soft and chewy while the outside was crisp, but not hard at all. When the pizza extends beyond the pan, I roll up the crust with a little cheese stuffed in the middle... not pizza hut's stuffed crust, but it sure is good.
This was our buffalo chicken pizza. Yummm.

Monday, July 7, 2008

Vanilla Bean Cheesecake

Isn't it funny how sometimes the simplest recipes are really the best? No unnecessary ingredients, no weird techniques, just basic flavors that compliment one another and make sense together. I love that. This is what happened with the perfect cheesecake recipe that was shared with me a couple weeks ago. I finally had a good opportunity to make it- Erin and Reed joined us for the holiday weekend. This is going to be my favorite cheesecake recipe going forward, I just know it. I think it will be easily changed, if you get the craving for a flavored cheesecake. However, the original was definitely the best this weekend.


Here are the graham crackers in my tiny food processor... I had to do them in batches, but it worked!


Once finely ground, you add some cinnamon and sugar to the crackers.
Then you mix in some melted butter until you have a crumbly mixture. This goes in the bottom of the pie plate. I packed it down quite firmly. Bake for about 8-10 minutes.Next for the filling. Here are those vanilla beans I mentioned- they were great. Slice down the middle and scrape out the vanilla. You can get quite a bit out of them so go back a few times with your sharp knife. Also try the dull edge to see if there is any left in there. Once you have scraped everything you can out of the bean, don't throw away that pod!! Fill a small canister with sugar and leave it in there- voila, vanilla sugar! I used it later in the weekend in a recipe and omitted the vanilla and you never would have known!
Another kitchen relic- I brought out the hand mixer. Worked like a charm as well! This layer has cream cheese, eggs, sugar, vanilla, lemon juice and lemon zest.
Finally I topped the cake off with a cream layer, which was tangy and sweet. It was so good that I don't have any pictures of it after this! It is best made a day ahead so that it can fully chill. It was a little hard getting the first few pieces out of the pan, I would recommend letting it come to room temperature a bit first. A springform pan would probably be preferable, but once the first quarter of the cake was out of the pan, the rest went perfectly.After our cheesecake on Friday night, we bundled up and headed down to La Jolla to watch the fireworks. They were perfect, as always. We watched from the beach where Chris and I got married. It was fun to have visitors for the first time for the fourth of July, we really enjoyed our weekend. Hope you had a wonderful holiday as well!


Blurry!!! Oh well...

Baking kick-off

Look what arrived in the mail two Thursdays ago! My first order from the King Arthur Flour Baker's catalogue. I ordered Italian flour, instant yeast, Vital Wheat Gluten, and sparkling sugar.

I had been looking for instant yeast here in San Diego and I couldn't find it. It seemed kind of silly to order it online, but I really couldn't find it anywhere. I have been a fan of King Arthur flours for a few years, and had heard that they were the best place to find special things for baking. Indeed they are! Unfortunately, with my order, also came a printed catalogue, as if I needed more encouragement to fuel this hobby! I have at least two more orders worth of items flagged. First thing to try was getting some rolls to rise. I have tried making sandwich rolls or hamburger buns before, but I just couldn't get them to rise enough. They were tasty little hockey-puck type rolls- the flavor was perfect, but they were super dense. Chris choked one down without complaining, but I know that he was internally wondering- I hope she gets this out of her system soon! Well, since that wasn't going to happen, I decided that something was wrong with my yeast, and I was ready to trade up and try the stuff that supposedly the professionals use.
So with this yeast, you just throw it into the mix dry with the other ingredients. Here is the start to my dough.
Add the other ingredients and let the mixer combine and continue to knead. Knead for about 10 minutes until the dough is soft and smooth. It won't be sticky.

Place the dough, once kneaded into an oiled bowl, turn a couple times so that the top is oiled also, then cover with plastic wrap and let rise. (Sorry this photo is dark.)
I let mine rise in the oven, heated to 150 degrees and then turned off. This was the dough after about an hour. Another good way to check for proper rising is to insert a couple fingers and see if the dough bounces back. If the indentation stays, then it's ready to go. I decided that I was going to use half of my dough to make cinnamon rolls. Since this was a lean dough, I brushed melted sugar over the rolled out dough and then sprinkled it with a sugar, cinnamon, and flour mix. Just mix whatever quantities of the three you want, this is a good place to 'wing it' while you are baking. The small amount of flour mixed in with the sugar and cinnamon keeps the spiral from opening up while it is baking. Kind of acts like glue between the layers.

I made the rolls at night and then let them rise in the morning while I got the rest of breakfast ready. Here they are after another 20 minutes in a 150 degree-heated oven. After that, it was time to make the glaze. Just a mixture of powdered sugar, milk, and vanilla. Whisk until smooth.The rolls baked at 350 for about 20 minutes. And the other part of breakfast- the healthy part! A fritatta with Canadian bacon, broccoli, and cheddar. I can already tell I will be ordering from KAF again soon!!

Here is the link to the roll dough. The other half were for sandwich rolls, but I didn't do the onion thing, although I am sure it was good. I just knew that Chris and I didn't need all those sandwich buns, but the cinnamon rolls ended up being great. There is another recipe on the site for cinnamon rolls as well, but this worked great.

http://www.kingarthurflour.com/blog/2008/06/20/onion-buns/

Tuesday, July 1, 2008

Rainier Cherry Pie

I've been bitten by the pie making bug...

These cherries were just too pretty to not be made into dessert. I am short on time at the moment, so hopefully the pictures will suffice until I can add in the dialouge. I didn't want to keep this from you though!

Edited to add:

Okay, first things first, I guess. Well, I was dying to know if I could make the crust with only butter and have any sort of success. Also, I had always only known of pie dough recipes that you could use your food processor to start. I hadn't really heard of using a stand mixer. Well, I went on King Arthur Flour's website and they did both. PERFECT. Exactly what I was looking for. I simply swapped out an equal amount of pure butter in my pie dough recipe and mixed it in the stand mixer. Easy as, well, I guess, PIE. Yikes.
The trick to a flaky crust, so they say, is to leave some decent sized pieces of butter in the dough not fully incorporated. Also, the chilling for a day or two helps, because you mellow out all the gluten in the flour. That's the stuff that makes the flour have 'get-up-and-go' power when you are trying to get dough to rise. Good for breads, not for pies. After mixing the dough, I separated it into two halves and shaped each into these hockey-puck shaped balls. Those went into plastic bread bags and then into the fridge.

Then it was on to filling. I went for 2 lbs of rainier cherries. They were delicious on their own, so I had a feeling that the pie would be good.
Little shower...
Pitting process
Beautiful new pie plate. I almost got this the day I made the strawberry peach pie. I should have taken the plunge, becuase it haunted my dreams for days afterwards. It needed me to take it home....
After letting the dough come to room temperature for about 10 minutes, it was time to roll. On a floured countertop, this dough was a D-R-E-A-M. I loved the butter so much more than the shortening. So much more mangeable!
Folded it in quarters for easy transfer to the buttered pie plate. (Are you sensing a trend here? Yes, this dessert requires a lot of butter! Not for the faint of heart, but your trip to the gym afterwards is worth it! I promise!)

In goes the filling.

I baked at 350 degrees for about 45 minutes. It said to start it at 400, but I found that was just too hot for all that butter. Shortening has a much higher flashpoint (or it might not even have a flashpoint, I am not sure if you can even really melt that stuff...) but anyways, 350 worked perfectly.


Chris even asked if he could take a cherry out of the middle while it cooled. I said no, of course! Haha, poor guy. However, his patience was rewarded, and mine was broken once we decided it had cooled enough after about 50 minutes. It was worth the wait. Recipe can be found here: http://smittenkitchen.com/2008/06/sweet-cherry-pie/

Wednesday, June 25, 2008

Pizza Dough


I promised that I would post the long-awaited pizza dough recipe. I have delayed, because I have tried many, and have yet to settle on my 'perfect' recipe. This is the best one that I have been using a lot lately, so I figured it is high time to share it. However, I will add this caveat: I placed an order on King Arthur Flour's bakers catalogue and it hasn't arrived yet. I might have to update my recipe here once I get my items and start experimenting with them. I am excited to see how that goes, but this works every time.


Pizza Dough

3/4 cup of white wine (I usually use pinot grigio, and it doesn't have to be a freshly opened bottle. NEVER buy cooking wine! Keep any leftover wine in your fridge to use in cooking. Especially in baking, it doesn't matter if it isn't brand new.)

1/4 water
2 & 1/4 teaspoons active dry yeast
1 -2 teaspoons of sugar
1 tablespoon of olive oil
2 & 1/2 cups t0 3 cups of flour
1 teaspoon of salt

Heat the wine and water for about 25 seconds in the microwave until around 100-110 degrees Fahrenheit. I recently read on the King Arthur website that yeast is kind of like you. If you don't have a thermometer, test the water on the inside of your wrist to see if it is warm enough. If it feels hot to you, it's probably too hot for the yeast. Once you determine that the water is the right temperature, sprinkle the yeast on the surface of the water and let stand for 5 minutes. (I have found that it helps to walk away at this point- you can leave the yeast for longer than 5 minutes, it is probably pretty happy at this point. The water should be foamy and fragrant before you do anything else to it.)
Add the sugar, olive oil, and 1 cup of flour to the mixture. It's important to never add the salt until you have at least added one cup of flour. Salt and yeast are not friends, and the flour acts as a buffer between them.
Another interesting thing that I have recently learned- Most of us are using WAY too much flour in our recipes. Unless you are sifting before you measure, you are probably scooping up to 6 ounces per cup of flour. Most recipes in cookbooks are tested with a 4 ounce cup of flour. Sounds minimal, but I have noticed that this makes a HUGE difference. If you don't want to sift, fluff up your flour with a spoon and spoon it into your measuring cup then tap and level off the top. Also, sometimes it helps to use the half-cup measure throughout the process. This prevents you from dumping in too much flour all at once and then you are past the point of no return.
So you now have 1 cup of flour mixed in. Go ahead and add the salt and 1 additional cup of flour. Mix all of the ingredients together to form a rough ball of dough. Add the remaining 1/2 to 1 cup of flour gradually just until the dough is not sticky. Then stop. Knead for about 15 minutes. If kneading by hand, sprinkle flour on the work surface only to prevent sticking. After 15 minutes, let the dough rest for 5 minutes, then check for elasticity. If the dough doesn't feel elastic (windowpane test- Tear off a piece of dough and see if you can see a membrane when stretched.) knead for about 10 more minutes. Oil a bowl and place the dough inside and cover with plastic wrap. Refrigerate for at least 12 hours.
Remove from the fridge and let come to room temperature. Also, you can heat your oven up to 150 degrees, place the bowl (keep the plastic on) inside, and then turn off the oven to speed up this process. After doing either step, remove the dough and gently deflate all of the gas. You are now ready to roll out your pizza!
I use a baking sheet covered with foil. I usually heat my oven to 415 degrees and place the rack in the lowest setting. I mist the foil with cooking spray and sprinkle it with kosher salt. Top your pizza and slide into the oven. I don't usually set a timer, but I think it takes about 15 minutes to bake. If your crust is brown on the bottom, but you want to brown your toppings a bit more, place it under the broiler for 2-3 minutes. Remove promptly, slice, and serve! You are going to love it!

Tuesday, June 17, 2008

Peach and Strawberry Pie


So I had my first foray into pie making this weekend. Chris' dad was in town for the US Open, and I had asked Chris what kind of dessert he would like for Father's day. Chris suggested a peach pie, not knowing that I had never made a pie, or how much work it can be! However, I had been eyeing a pie recipe for a couple weeks, so this was a perfect excuse to dive in!

I am pretty well versed in tarts, I have made a couple different ones even just in the past few days. I took a Chocolate Carmel tart to work last Friday and I made a quiche when our friend Adam was visiting a couple weekends ago. But pies, no, I hadn't gone there yet.

So I did my research and decided to use a pastry blender rather than my food processor. My food processor is getting old and is pretty small. I didn't want to have to do two batches to get my two crusts. So I bought this pastry blender at Crate and Barrel. I did some research on Smitten Kitchen to see how to make the crusts. I really would like to try a recipe with only butter and no shortening, but since I didn't want any meltdowns for a special event, I figured better safe than sorry. If anyone has experience with butter only, can you tell me if it works?

To make the filling, I had bought some peaches, but I was pressed for time, so I defaulted to frozen peaches. They were great, and the boys never knew that I didn't spend all that time pitting and peeling peaches. The strawberries were huge and the flavor was unbelievably flowery. They were in the peak of ripeness.

After mixing, and chilling for an hour, the dough was ready to go.
I was looking for a fluted pastry edger at C&B, but they didn't have one. Luckily Williams-Sonoma had this one.


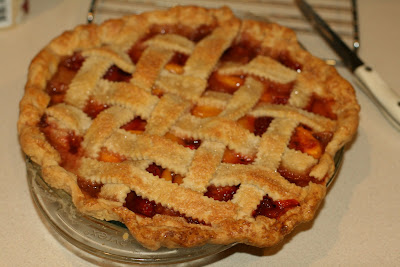
I wove the lattice over the top and crimped the edges. Not as perfect as Mom's usually are... but it tasted good. I am excited to work on perfecting the crust. I might have to bring you out Mom just for a quick refresher course on that! I am sure we would have fun trying different pies. Chris has requested a lemon meringue and a banana cream pie at some point. Looks like I will have no problem practicing!

Peach and Strawberry Pie

Crust:

3 cups of all purpose flour

1 tablespoon sugar

1/2 teaspoon of salt

2/3 cup chilled vegetable shortening, diced

1 stick plus 2 tablespoons chilled butter, diced

10 tablespoons ice water (I didn't use all of the water, but wondered if I would have had less cracking of the dough as I was rolling it out if I had. Does anyone know?)

For the filling:

4 cups frozen peaches (about 1-2 bags from the grocery store)

3 cups of fresh strawberries, hulled and quartered

1/2 cup golden brown sugar, packed

1/2 cup sugar

1/4 cup cornstarch (I increased this by a teaspoon or two, and probably could have increased it even more.)

1 teaspoon ground cinnamon

1/4 teaspoon salt

1 egg, beaten with a splash of water for the glaze

Combine crust ingredients in a large bowl and cut in the shortening with the pastry blender. Add the water 2 tablespoons at a time until the dough starts to come together. Once fully moistened, gather the dough into a ball and cut it in two. Form each half into a ball and place them in separate plastic bread bags. Press down to flatten balls slightly into disks. Refrigerate for at least 1 hour until chilled. Can be done in advance.

Mix the filling ingredients in a large bowl and stir to combine. I let this defrost on the counter for about an hour and a half before baking.

Assembly: Take the first dough disk out of the fridge and remove from bag onto a generously floured counter. Allow to come to room temperature for about 10 minutes. Flouring the rolling pin and gently roll out the dough to approximately 13" in diameter. Place into a buttered pie dish letting the sides hang over the edge. Spoon the filling evenly into the crust. Roll out the second dough disk in the same manner as the first. Using your fluted pastry edger or a pizza cutter, slice 3/4 inch strips of the dough. Place the longer strips across the middle of the pie, saving two. Place five strips across the top of the pie. Working one at a time, start on one side and fold back 3 of the 5 strips. Lay a new strip across the 2 remaining strips, then fold back the 3 strips to cover. Continue, alternating folding back the 2 or 3 strips as you weave the lattice top. Trim the excess dough and strips around the sides leaving about an inch overall. Press the bottom crust and strips together and crimp with your fingertips. Brush with the egg glaze and sprinkle with coarse-ground sugar.

Bake at 400 degrees for 20 minutes, then reduce to 350 degrees for 50 minutes to 1 hour. Cool in the pan on a rack for an hour before serving.

Monday, May 12, 2008

Pizza

So, you all know that I love to make pizza at home. Well, it never occurred to me that even though I make the crust from scratch, I should try to make the sauce from scratch too. I think there is something daunting about the thought of peeling endless tomatoes to make fresh tomato sauce. I also have never been a big "red sauce" person, but I do like pizza sauce because it ususally tastes lighter to me. Well, as with many things- if you think you don't like something, you should try making it yourself. You will probably tweak it in just the right ways that you will realize what you've been missing all along.

So the sauce is actually really easy to make. I grabbed a big package of tomatoes at costco. You probably need about 4 roma tomatoes or about 6 small tomatoes on the vine. I've made this with both- the roma are probably the perfect tomato for this, but if you don't like a chunky sauce, you will have to blend it before you use it. The smaller ones just disintegrated into gorgeous yummy sauce. (More tomatoes to peel, but honestly, this part is sooo much easier than you'd think!) Fill your pot with water deep enough to submerge the tomatoes and bring it to a boil. Then drop them in and boil for only one minute. Strain and return the pot over the medium flame until dry, then add a couple tablespoons of olive oil. (Extra Virgin Olive Oil, of course!) Crush two cloves of garlic into the oil using a garlic press and sautee lightly, don't let the garlic brown. Then add 1/2 tsp (or more or less, depending how much spice you enjoy) of red pepper flakes. Take a look at your red pepper flakes- if they are not a bright red color, toss them and grab a new package at the store. They have lost their kick unless they are bright red in color. While the garlic sautees, quickly peel the tomatoes. I wrapped them in a paper towel and just twisted with my fingers a bit, and the peel came right off. Sometimes the roma tomatoes required a little slit in the skin, but then the peels come right off. Add the peeled tomatoes to the pot with a splash or two of white wine and bring simmer for about 30 minutes. Using a wooden spoon, break up the tomatoes as they cook. They will break down further as you simmer. Use a store bought crust or make your own- it is really very simple. (recipe to come)
Line a baking sheet with foil and spray with cooking spray. Sprinkle with a little kosher salt before spreading the dough on top. You can sprinkle with cornmeal if you like, but I don't like the texture of that on my pizza so I avoid it. If your oven is hot enough, you don't need it. Heat the oven to at least 415 degrees, some people say as high as it will go. I usually don't go past 435, but I am always a wimp when it comes to oven temperatures. I hate burning things. Cook on the lowest rack for about 15 minutes. If you like, broil for the last 2 minutes to brown the top of the cheese. (This might happen automaticallly if you use a higher setting to begin with, but I haven't tried it.) Once you have the consistency of the sauce you want, pour it over the prepared pizza dough.Add some cheese- this was fantastic fresh mozzerella that I also got at costco. They have a lot of surprising things when you look past your staples. The buffalo mozzerella was definitely the better choice for this recipe. When it melts it just gets ooey-gooey as opposed to chewy. I tore these pieces up, but if you want an authentic look, use the circles whole and your pizza will just have spots of cheese. Sprinkle with a little fresh grated parmesan also. If you are using toppings, place them on top of the cheese. They will cook more this way and be more tasty.

Try to let it cool a little before eating it. This is the hardest step, but burning the roof of your mouth really ruins the experience! Thank you to smitten kitchen for the above recipes (which I modified only slightly) and giving me the courage to try making my own sauce. I am so happy that I did!

Wednesday, April 23, 2008

Chocolate Shortbread


You can't begin to imagine how good this is. Sooooo simple. And yet... fantastic. I really like shortbread plain. I have been wanting to try it topped with melted chocolate, but I was worried about the textures. The chocolate is hard once it chills and the shortbread is crumbly. I thought that I would just end up with little pieces of shortbread stuck to the chocolate sheets. And it's not perfect. Oh, it's pretty here in these pictures, but once you cut into it, it is going to crumble a little bit. So it's not a party cookie, unless you are cool with asymetrical cookies that might be all different sizes. But for a weekend treat that you will enjoy all week it's great. I used the shortbread recipe in the Williams-Sonoma Essentials of Baking and just covered it with melted chocolate. It probably took less than 1 cup of chocolate chips... I didn't want it too thick. I used the leftover melted chocolate to cover strawberries. Also super simple and divine. Seriously- they are so easy, so good, and not that bad for you. I wonder why I don't make them more. They didn't make it to the picture-taking stage... we ate them! ;) I will post the recipe for the shortbread when I do the Chocolate and Zucchini cake... sorry, I know I am behind! Happy Wednesday- we are more than halfway there my friends!

Classic Shortbread
1 & 1/2 Cups of all purpose flour
1/4 cup cornstarch
1/8 teaspoon salt
3/4 cups of unsalted butter at room temperature
1/3 cup sugar
1 teaspoon vanilla extract

Combine the butter and sugar in a large bowl, beat on medium until smooth and light in color, about 3 minutes. Mix in the vanilla. Add the dry ingredients and beat on a low speed until the dough pulls away from the sides of the bowl. Using an offset spatula, spread the dough evenly into a 9 & 1/2 inch tart pan with a removable bottom. Prick lightly over the top with a fork. Bake at 300 degrees F for 55-65 minutes. Remove from the oven and cut the warm shortbread into 12 wedges. Let the shortbread cool completely in the pan on a wire rack. Once cool, melt the chocolate in a double boiler or the microwave. Pour over the top of the shortbread, and place the shortbread in the freezer to set. Once set, place the pan on top of an inverted bowl. Gently ease the sides of the pan away from the bottom. Cut into wedges and enjoy.

Williams-Sonoma The Essentials of Baking