Monday, January 12, 2009

Cherry Lemon Frozen Yogurt

I got a gelato machine for Christmas and I was sooo excited to try it out!! Chris and I love frozen yogurt, but we are hooked on a particular tart flavor. If you've had Pinkberry or Golden Spoon's Simply Tart then you know what I am talking about. Also, when we went to Hong Kong, there was a gelato shop that carried a yogurt blackberry gelato. It might have been the 90 degree heat plus the 90% humidity, but we were totally addicted that week! The gelato ladies started to recognize us! We found a similar thing in Tucson at Frost Gelato. (If you have a chance to go, do not miss it!!) I don't know what causes the obsession, but it might be kind of like sweet and sour candy. It's really tart, but then sweet and it makes you just want more. In any case, I couldn't wait to see if I could recreate it. Of course, I always want to make it better, and I think I did...

So you start with 1 large container of strained greek yogurt. I tried this both with the fat-free variety and the 2% variety. The 2% gives you something more like gelato, whereas the fat-free version is more like classic frozen yogurt. Both are fantastic. This is nice to have on hand when you want to skip the step of thickening your ice cream or gelato base. No waiting!

I was lucky to find cherries at the store- hooray! Above any other fruit, they are by far my absolute favorite. You can use other things if you can find them, strawberries, blackberries, or raspberries would work well substituted here if you can't find cherries. I pitted the cherries and chopped them roughly, making sure to scrape all the yummy juice into the bowl and not lose it!
I'd say that I had about a cup of cherries once I finished. To that I added some meyer lemon zest and the juice. I used the zest of 2 lemons and the juice of one. Finally, I added 1/3 cup agave nectar, which is not only better than sugar, it takes a step out of the process. If you can't find it, or want to use sugar, make sure to melt it into a simple syrup first. The sugar won't dissolve in your ice cream and you don't want the grittiness of sugar in this dessert.Add the yogurt to the bowl, and stir to combine. Freeze in your ice cream maker for 30-40 minutes or until it reaches the desired consistency. Place the finished dessert in a plastic container (just save the one that the yogurt came in) and freeze in the freezer for an hour or so before eating to firm it up.
Scoop and enjoy. Totally addictive, yummy, and healthy. Really healthy for a dessert. ;)
If you don't have an ice cream machine, check out this to see other ways of making ice cream. Just takes a little elbow grease!

Tuesday, January 6, 2009

Super Quick and Healthy Turkey Chili

This chili is very healthy and super easy. Chop one large onion (or a couple small ones) and cook over medium heat in your biggest stock pot. You want the onion to cook until translucent, and not brown, about 5-10 minutes.Then chop a couple peppers of your choice- I used pasilla peppers which are a little bit more flavorful than green bell peppers. Chop these and add it to the onions, cook for about 5 more minutes. Once cooked, the onions and peppers should look like this:
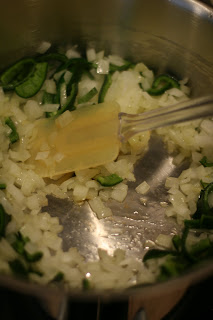
To that, add 1 pound of ground turkey or ground turkey breast. I prefer ground turkey breast, but it is sometimes hard to find. Cook, breaking up any large pieces until browned throughout.Now it is time to season. I used 2 tablespoons ground cumin, 1 tablespoon chili powder, 1 tablespoon ground corriander, and 1/2 teaspoon of cayenne pepper, plus additional later to taste. Don't add the salt until the end. The beans will stay firm as long as they aren't too salted until the end.Add 3 cans of rinsed beans, I used 2 cans white beans (sometimes called cannellini) and 1 can black beans. If you want to make this vegetarian, add 1-2 more cans of beans. Use whatever combination that you like! To this, add 1 box of chicken broth, (4 cans) preferably low sodium if you have it. If not, just taste the chili before adding the salt at the end. After simmering for a while (as long as you like) I thicken the chili with a little roux. Melt 4 tablespoons of butter in a small saucepan.
Add 5 tablespoons (1/4 cup + 1 tablespoon) of flour to this once the butter has melted and cook over medium heat. Whisk to keep the mixture smooth. I love using whole wheat flour here, it adds a nice nuttiness to the chili and keeps the glycemic index a bit lower then white flour. If you can find whole wheat pastry flour, it's a great alternative to all purpose for these kinds of things.
Cook the roux until bubbly and completely incorporated. Cooking this simple mixture takes the flavor way above just butter and flour. This little bit of mixture will thicken the whole pot of chili remarkably.

Taste the chili, and season with salt, pepper, and more cayenne pepper if you like. I used about 1 teaspoon salt, 1 teaspoon ground black pepper (don't feel like you have to measure this) and an additional 1/4- 1/2 teaspoon cayenne. Squeeze the juice of 2 limes over the top of the chili and stir to combine.
Serve with chopped tomato, avocado, plain yogurt, shredded cheese, and any other toppings that you like. The chili can simmer indefinitely on the stove covered if you aren't ready to eat it right away. You can also freeze it, just defrost in the fridge before heating. Makes about 8-10 cups of prepared chili.
Cozy up to a warm bowl with a green salad, a quesedilla, or even just a toasted slice of bread. It's hearty and satisfying. Super Quick and easy!
Shopping List:
1 pound ground turkey or turkey breast
1-2 yellow onions
Peppers/chilies of your choice
3 cans beans (black, pinto, or cannellini are good choices)
1 box chicken broth, low sodium
2 limes
Cumin, Chili Powder, Ground Coriander, Cayenne Pepper
Toppings of your choice: Cheese, avocado, tomatoes, plain yogurt

Friday, January 2, 2009

Giada's Nutella Cookies

If you like Nutella, these cookies are for you. If you like chocolate and hazelnuts, these cookies are for you.
I know, I know. You're thinking, "Wait!! It's the second of January. This is the time for New Year's Resolutions! This is the time for healthy eating! I promised to be good!" Well, don't get too worried. Yes, these are a dessert, but c'mon. Dieting without any dessert is just no fun. I promise that these are a yummy treat that will satisfy that chocolate craving and not completely un-do your post holiday hard work. Granted, you can't eat the whole batch in one sitting and still claim to be dieting- but a little reward now and then keeps us on track. So if you are ready to indulge a little, get out a bowl and here we go!
The recipe is happily basic and easy. Something you can whip up in a quick afternoon or evening. If you want to limit your consumption, you could freeze half of the dough and bake these later. There is only 1 cup of added sugar (granted the nutella is sugary) and only 1/2 cup of butter (granted the nutella is buttery). So start with your butter, sugars and nutella and beat until fluffy and fully incorporated. Like this:

To the creamed mixture, you add the eggs and vanilla and beat for a couple more minutes. Then add the baking powder, soda, and salt, followed by the flour. Once just barely combined stir in the chocolate chips (or nuts, if you prefer). We are not huge fans of nuts in our cookies, so I swapped them out for chocolate. I personally can never have too much chocolate, but if it isn't your favorite flavor, you might want to try the hazelnuts. Bake at 375 degrees for about 8-10 minutes for teaspoon sized cookies, or 12-15 minutes for tablespoon sized cookies.
Enjoy with a cold glass of milk- you will need it!
Adapted from:
Giada's Nutella Biscotti
(From her most recent book, Giada's Kitchen, Giada explains that her grandmother called these cookies biscotti, even though they are drop cookies. I think it was a good idea to go along with Grandma in this case, no matter what you call them, they are fantastic!)

1/2 cup butter, softened
1/2 cup nutella (about half of a small jar)
1/2 cup light brown sugar, packed
1/2 cup sugar
2 eggs
2 teaspoons vanilla extract
2 eggs
1/2 teaspoon baking soda
1/2 teaspoon baking powder
1/2 teaspoon kosher salt
1 cup semi-sweet chocolate chips or toasted, chopped hazelnuts

Tuesday, December 30, 2008

Cranberry Lemon Scones

This is one of those recipes that is totally worth it. You won't believe how good these are, and you'll be shocked at how little sugar it takes to make these beautiful fresh cranberries delectable. Part of the trick is chopping up the cranberries first. You'll need about a cup and a half.Once chopped, let them macerate in their own juices with some lemon juice and sugar- you only need 3 tablespoons, which was shocking to me. I thought with their reputation for being super-tart, that more sugar would be needed. Not so.

Meanwhile, they go in these fantastically flaky, crumbly yummy scones- which are really biscuits masquerading as a sweet breakfast treat. Be careful not to overwork the dough, you want it to kind of come together at the end- then stop. This will keep the scones flaky.

Roll out the dough to about a 1 inch thickness and using a biscuit cutter or a glass, cut out as many circles as you can. Keep re-rolling and cutting until you use up the dough. Place on a baking sheet lined with parchment paper spacing about 2 inches apart. You can bake them plain, sprinkle some coarse sugar on top, brush the tops with cream, but any option is yummy. Once baked, cool on a cooling rack then store in a airtight container. You'll want to eat these within a day or two, so if you don't think you will eat them all, just freeze the ones you won't use until you are ready for them again. It won't take long! Lemon and Fresh Cranberry Scones

Friday, December 5, 2008

Butternut Squash Soup

I love butternut squash. I think it is one of those awesome vegetables that is just as hearty as potatoes with a meal, and so much better for you. Also, it couldn't get easier, really. Just halve open that bad boy and roast it for a while at whatever temperature you are already using your oven (or 375 degrees if it's in there solo) and in 35-40 minutes, it's perfectly tender. Slightly sweet, it only needs a sprinkling of salt and a pat of butter to make the perfect side dish.
Therefore, I hardly ever do anything else with it. I have a hard time getting past that preparation, especially when I am doing other, more complicated things. So, when I saw this soup, I thought, I should broaden my horizons. Combined with sweet yellow onions, garlic, and chicken broth, the idea of the soup had me ready to break with habit.
Now, it wasn't bad at all. I just felt like the amount of work required didn't measure up to the end product. I think the next time I will make a few adjustments. Also, if you really want to try this, I would recommend looking for the peeled and pre-cut squash in the refrigerated section of the market. I have seen this from time to time at Costco or Trader Joe's. While fresh squash is good, it was a lot of work to peel these guys.
With such beautiful color, you have to be getting a lot of nutrients from this soup. Finished off with a bit of cream and some toppings (see below) this is a comforting addition to any meal- or with a salad, it could probably be a meal by itself!
Butternut Squash Soup
Makes about 2 quarts
1 & 1/2 - 2 sweet yellow onions, diced
3 cloves garlic, crushed or minced fine
2 tablespoons butter
4 pounds butternut squash, peeled, seeded, diced and roasted slightly
2 teaspoons cumin
1 teaspoon ground coriander
1/2 teaspoon ground ginger
1/4 teaspoon cayenne powder
1 box (3 cans) low sodium chicken broth
1/4 cup cream (at room temperature)
1 teaspoon kosher salt (start with half if you aren't using low-sodium broth)
ground black pepper to taste

Saute the onions and garlic in the butter in the bottom of your largest stock pot over medium heat until translucent, but not brown, about 8-10 minutes. Add the squash and the spices, stir to coat. Add the chicken broth and bring to a simmer. Cook for about 30 minutes, or until the squash is very tender. Add the salt and pepper. Blend with an immersion blender until smooth. Add the cream and stir to combine.

Toppings: Dried cranberries, toasted chopped walnuts, chopped sage leaves, chopped flat parsley, and/or grated hard cheese such as Gruyere, Percorio Romano, or Parmesan.

Wednesday, December 3, 2008

Tucson

If you haven't been to Tucson in a while, you are missing out. It's such a fun, funky town, and it moves at a totally different pace than the big cities. It's a great escape for us, and perfect for a 2 night stay, which we did the weekend before Thanksgiving. Watching sports at the U of A campus is usually what draws us there in the first place, but there are so many other things about Tucson that we enjoy. After the game- which was a heartbreaking loss to the Oregon State Beavers on a last minute field goal- we spent a couple days just enjoying the city.

We hiked at Sabino Canyon, which is really breathtaking. It's a national forest park and one of the most interesting ones at that. It's situated within the city of Tucson, unlike most parks you don't have to drive away from the city to get to it. It's a canyon, but instead of viewing it from the top down like the Grand Canyon, you walk in at the floor level and enjoy it from the bottom up.Arizona's national flower is the saguaro flower, but the saguaros aren't as prevalent throughout the state as they once were. These beautiful cacti are the iconic versions of the ones in westerns and cartoons- super green and huge, towering over the other desert flora.
Even though we were warned of mountain lion sightings, we braved the canyon to these spectacular views. We didn't really see any scary animals, luckily, but we did see a few deer relaxing in the shade. I think they picked a good spot to live!

We also checked out the house where Chris lived while going to school there. He and his mom, brother and sister fixed up this super cute house in the Sam Hughes neighborhood near the University. It still looks great, and the landscaping is thriving!
Finally, our trip would not be complete without a trip (or two) to my favorite, Beyond Bread. I got a good roll of the eyes when he spied me taking the camera in with me, so I didn't take as many pictures as I might have otherwise, but I think I picked a good subject for these two photos... would you agree??

Now that is a dessert!

Tuesday, December 2, 2008

More to come!

Having trouble getting photos to upload, but I have lots to share with you. Hope you had a wonderful Thanksgiving!